Divi Features
This document is intended to navigate you through the different features on your website, and how to edit or create each of them.
For ease of use, all sections (layouts) currently built on the site, and shown on the Layouts Example page, have been saved into the Divi Library. You can pull sections from the Divi Library but you will not be able to access the library to modify the elements within layouts.
When editing or creating new pages, if your page or section is not looking as it should, go to the layouts example and reference the styles and formatting that we’ve used on the comparable Module.
Table of Contents
- Pages
- Creating & Editing Pages
- Permalinks (URLs)
- Page Attributes
- Yoast SEO
- Page Blocks
- Modules
- Content Editor (WYSIWYG)
- Content Styles
- Creating & Editing Pages
- Blog Posts
- Media Library
- Forms
- Menus
- Footer Areas
- Need More Help?
Pages
Creating & Editing Pages
To create a new page, go to: Pages > Add New
To edit an existing page, go to: Pages > find the page you’d like to edit > Edit
- Enter a title in the field that says “Add Title.”
- This is just for internal labeling
- Permalink — This is where you can update the URL for the page.
Note: Upon saving the draft or publishing the page a URL will be auto-generated based upon what is entered into the title field. If you wish to change or adjust this URL, you can do that under the “Permalink” section. - Page Attributes — This is where you can assign a parent page.
- If you assign a page to a parent page it will change the URL structure of the page.
- If “new page” is assigned to “old page,” its URL will change to old-page/new-page.
- You can set the order of pages in the visual navigation in Appearance > Menus. (directions below)
- Yoast SEO — Scroll to the bottom of the page to the “Yoast SEO” section. Here you should see options to edit the SEO title and meta description.
- Add specific SEO title and meta description for the page.
- Use the social sharing tab in Yoast to set specific content for Facebook and Twitter.
- You can also hide pages from sitemap and Google search:
- Go to the “Advanced Settings” tab in Yoast.
- Select the settings No (Index) and No (Follow) will hide pages from the sitemap and Google search.
- The Divi Builder – click on the Purple button at the top of the page.
Note: Once you have entered any content into Divi, do not select “Return to Standard Editor“, or you will lose all of your content on this page!- Divi Builder will start you with three options: Build From Scratch, Choose a Premade Layout, or Clone Existing Page. Though you can build from scratch using (one by one) the layout on the example page, you may want to start with a saved layout or cloning an existing page in order to speed up the process a bit.
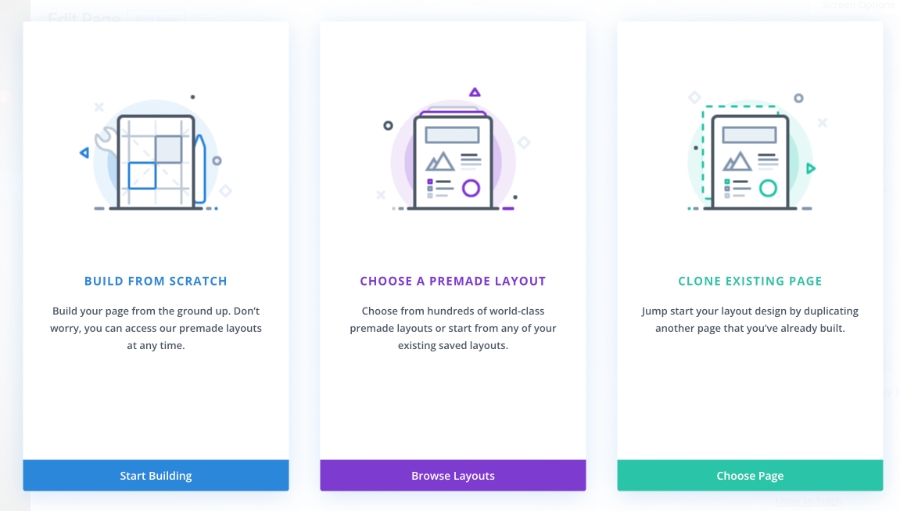
- Premade Layouts and Clone Existing Page – We have a few template pages already laid out and saved for this site with various page blocks and unique stylings for this type of page. You will also be able to add (or remove) any of the individual sections on the Layouts Example page to these saved page layout template. You can also clone an existing page on your site. For example, if you’ve already completed a “Project Detail” page that is different than our saved layout, you may choose to clone that existing page.
- Divi Builder will start you with three options: Build From Scratch, Choose a Premade Layout, or Clone Existing Page. Though you can build from scratch using (one by one) the layout on the example page, you may want to start with a saved layout or cloning an existing page in order to speed up the process a bit.
- Save the page as a Draft or Publish to make it live.
Page Blocks
Once your page is set up, and the Divi Builder is on, you can begin adding in page blocks to build out the page. Refer to the Page Block Master for all of your page block options. There are two ways to add a page block to a page:
1. Copy and Paste a Page Block from the Page Block Master
- Go to the page block master and click “Edit Page” to go to the back end
- Find the page block you want to add to your page
- Right click on the blue section
- Select “Copy Section”
- Then navigate to the back end of the page you want the page block to live on
- Find the blue + icon
- Right click, and select “Paste Section”
- Now you should see a new iteration of that page block that will live on this page
- Swap out the content and save
2. Add a Page Block from the Divi Library
- Identify the spot in the page you’re building where you want the page block to live
- Find the blue + icon
- Select this and then go to the “Add from Library” tab
- Here you should see a menu of all of the page block types that we’ve saved to the Divi Library.
- Select the one you want (or use the search feature) to add the page block to the page.
Commonly Used Modules
These modules are used throughout the site. Quick instructions and notes related to these modules.
- TEXT – Text modules use a standard WYSIWYG (see below for more information).
- IMAGE – Image modules can be used to pull images from the media library.
- VIDEO – Video modules can be used to pull videos from the media library or from a video URL.
- BLURB – Blurb modules are used for modules that require both an image (or icon) and text. These also often include links.
Content Editor (WYSIWYG)
Entering content into the content editor:
- You can type content directly into the WYSIWYG editor or copy/paste from a word processor.
- If you are copying and pasting content, always use the “Clear Formatting” button after pasting. You can also “paste as plain text.”
- Use the “Special Characters” button (Ω) to replace any special characters from pasted content. If not, the coding may be different.
Content Styles
For more information about all of the various content styles possible for your site, visit your Content Styles Page.
- Header Styles
- Different header styles are preloaded in the “Paragraph” dropdown menu and are labeled (Header 1, Header 2, etc.)
- You will never have to select h1 as the page name or title override will automatically create the h1 for this page.
- Highlight the text and then select the desired header style.
- Format Styles
- Different format styles are preloaded in the “Formats” dropdown menu.
- Add intro text styling by highlighting the text and selecting “Intro Text” from the dropdown.
- Turn links into buttons by highlighting the link text and selecting “Button” or “Button Secondary” from the dropdown.
Blog Posts
To create a new blog post, go to: Posts > Add New
To edit an existing blog post, go to: Posts > find the blog post you’d like to edit > Edit
- All blogs are stored in “Posts”. To see all the posts that have been created, click the “Posts” link.
- Add your title and permalink at the top.
- Add your categories and featured image in the right-hand sidebar.
- Add your content in the page content WYSIWYG or enable the Divi builder (purple button).
- Update your title and meta description in the Yoast SEO settings.
- Click Publish.
Blog Landing Page
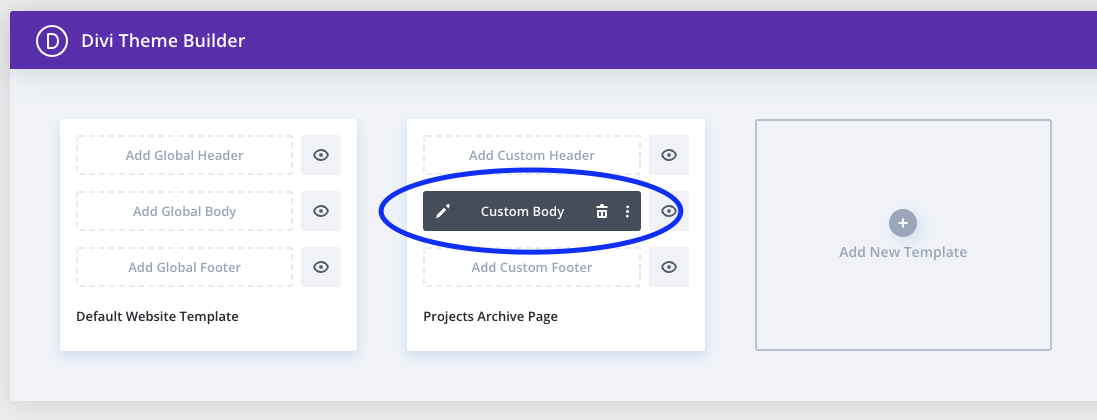
To edit the blog landing page, go to Divi > Theme Builder
- In the theme builder, you should see templates listed for all of the post type landing pages on your site

- Find the landing page that you want to edit and click the pencil icon next to “Custom Body”
- This will take you to the editor where you can edit the content in the header and footer of the landing page
Media Library
Note: Images should be cropped and compressed before adding to the media library. It is recommended that images be no larger than 250kb (though sometimes this is unavoidable). You will want to crop the image to the appropriate dimension prior to compressing. This site, tinypng.com, can be helpful in compressing file sizes for sized images.
To view the Media Library, go to: Media > Library
- To add new images and files, click the “Add New” button at the top of the page. Then click “Select Files” or simply drag and drop a file into the window.
- You can add files directly to a specific folder or drag and drop them into the proper folder later.
- You can click on any media item to edit the following fields:
- Alternative Text
- Title
- Caption
- Description
- File URL
- Images used for means other than decoration should have their titles, captions, and descriptions removed and should include alt text to describe the image so a screen reader can inform the user of the contents of the image (e.g. Woman using phone at desk). Image alt text should describe the image and should not use special characters.

- For more information on how to add alt text, read our accessibility page.
- If you’re editing a PDF, the “File URL” field is the link you will use for linking directly to the PDF.

Note: The media library can be filtered by type or date and is searchable by title.
Forms
To create & edit forms, go to: Ninja Forms > Dashboard
- Here, you should see all of the forms on your site.
- Click the gear icon next to your form to edit, duplicate, preview, and delete your form. You can also view the submissions in this location.
- Either click “Add New” or edit an existing form.
- Go to the “Form Fields”
- Add in the form fields you want with the blue + icon in the lower-right corner.
- Once desired form fields are added. Click “Publish.”
Note: This button will always say “Publish,” even if the form has already been published.
- Go to the “Email & Actions” tab
- Edit redirect, email admin and email user settings for each form
- Redirect — Redirects to thank you page
- Email admin — You can customize the way each submission hits your inbox: from name, address, to email (very important), subject, and fields.
- The Advanced Settings below the html window allow for additional email parameters to be added. If an auto Reply email, CC or additional email addresses need to be added to the form. Can be done here versus creating new email addresses.
- Once the form is complete, copy the short code and paste into a content editor.
- Edit redirect, email admin and email user settings for each form
Menus
To edit menus, go to Appearance > Menus
Note: The social media menu in the footer is in a different location. See below.
- Go to the “Select a menu to edit:” dropdown, and pick the menu you want to edit.
- Use menus to organize how you want the various menus to display.
- Adding Menu Items —
-
- Find the page (or other type of menu item) you want to add to your menu from the “Add Menu Items” selection area on the left.
- Select “Add to Menu,” and the page will appear at the bottom of that menu.
- Drag and drop the page you added to the spot in the menu where you want it to appear.
- To set something as a child menu item, drag the page so it appears indented underneath the primary page.
- Click the arrow on the right side of the menu item for more options. In this area, you can edit the following items:
- Navigation Label (the text that appears in the menu itself)
- Title Attribute
- A checkbox for opening links in a new tab
- (optional) CSS Classes
-
- Once you’ve got the. Menu the way you want it, click the “Save Menu” button in the upper-left corner.
Footer Areas
To edit the Footer Areas, go to: Appearance > Widgets
- Under Appearance > Widgets, you should see various widgets
- These are the widgets that we’ve set up for the footer areas.
- Expand the text areas, edit the content, and save.
Need More Help?
Should you need further assistance, you can find specific instructions on the Divi Theme Documentation Website
If you cannot find your answer, submit a ticket to the Orbit Support team for assistance.
